
~ Words and sample images by Danie Bester
Learn all the important aspects of shooting Travel, Landscapes and Seascapes! This “mega” tutorial is derived from a series of articles I wrote for PiX Magazine in 2013; covering technical and creative aspects of travel and landscape photography; from choosing the best locations and finding the best light, it also covers camera gear, settings and creative techniques…


Get out there! Find the best locations
Ansel Adams said that “Sometimes I do get to places, just when God’s ready to have somebody click the shutter”. I believe that this is the foremost key to landscape and travel photography. Rule no 1. You need to get to places! You can only photograph your own backyard so many times! Then again, not everyone can be an international travel photographer, but with a little research and scouting, you will be able to find picturesque scenery close to home. Even if you live in the city, you can always shoot urban landscapes. You could also plan your off weekends and holidays around visiting rural, or scenic places. Here are a few tips on finding the best locations:
- Read books about areas you’re planning to photograph, such as travel guides and even books on the local architecture.
- Make sure that your visit is in the right season i.e. it won’t help if you take a Namaqualand trip in the middle of winter and miss the carpet of flowers!
- Cut your road trips to destinations in half by sleeping over at scenic places and take some pictures while you’re there.
- Book hotels and guesthouses with great views.
- Visit small Towns en-route to your destination, talk to the locals and photograph them while including some of the local landmarks in your compositions.
- Enquire about scenic places from the locals and tap their local knowledge.
- Get up early and avoid the rush of people when you’re out shooting picturesque villages or urban scenes and you will have the added benefit of being there when the light is soft.
- Stay over at venues that are close to “photogenic” places so that you can get quick access.
- Take the road less traveled; take alternative routes instead of the highways.
- See if you can “work” the same area(s) at least twice. I always capture my best images while on a second, or returning visit.

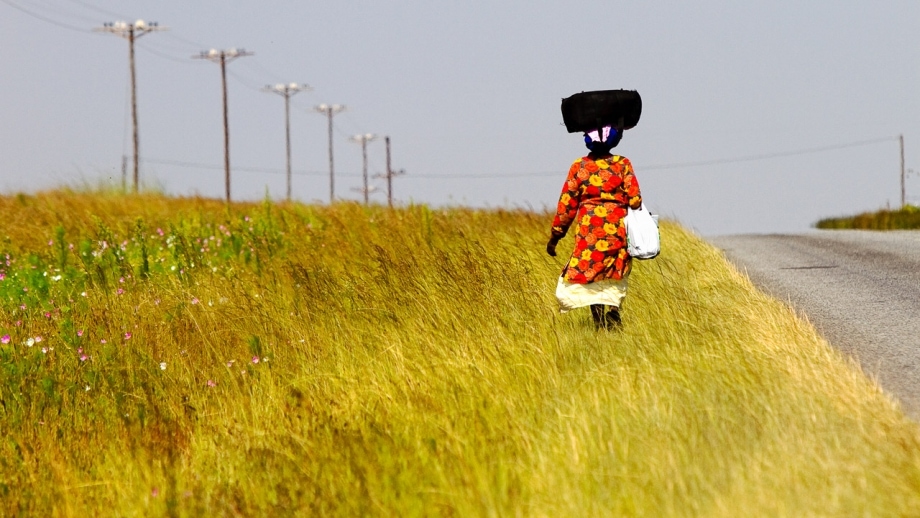
“Lettie” this Candid shot was taken alongside a rural road. Take the road less travelled and be on the lookout for interesting scenes with people in
Shooting with Intent…
Professional landscape and travel photographers often stick to specific themes, or projects. Focusing on a singular theme will help you to present a collection – a body of work – which may be more significant than having a few “scattered” images with little cohesion, in your portfolio. Saying this, I am not implying that you should ignore once in a lifetime opportunities because it does not fit into your current project. Shoot those as well, but when you do go out to shoot landscapes, do it purposefully. Plan your trips, research your subject(s) and scout the locations you’re going to visit long beforehand. Planning, research, and visiting the same location more than once will ensure greater success.

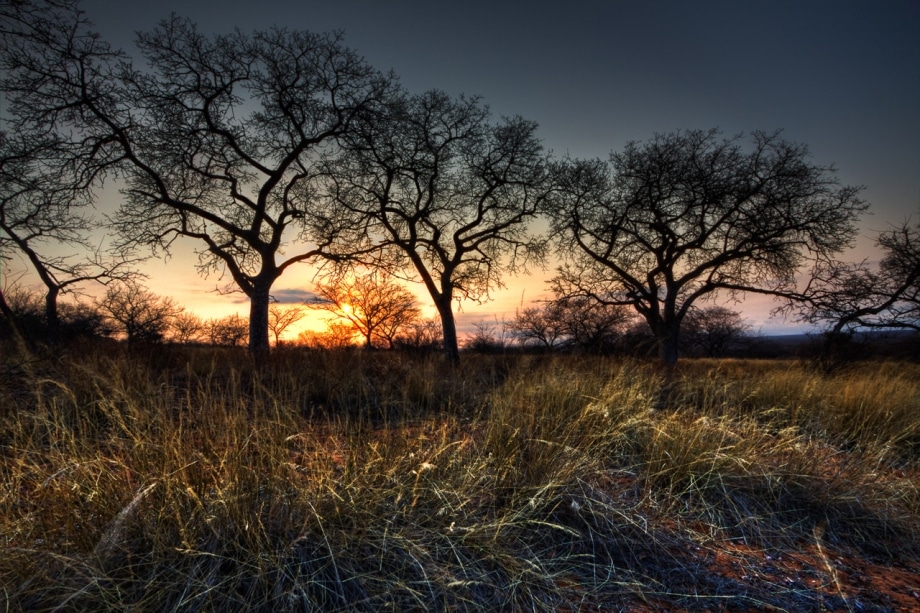
“Marula Veld, Limpopo Province” This HDR image formed part of a project I did on Africa Trees and was a signature photograph at my first solo exhibition in 2010. Since then, I continued adding to my Africa Tree collection, and I now have a significant body of work. ISO-100 at f/22. Tripod used.
Safety first
Photography is not worth your life. Here are a few safety tips you should consider when traveling:
- Do not go to “unsafe” places on your own. If possible, always travel in with a companion, or group whom share your love for photography.
- Having a reliable and serviced vehicle when roaming around is of the utmost importance. When you’re out in rural areas, you most certainly cannot afford breakdowns. If you’re out 4x4ing always go in a convoy!
- Stay connected to the outside world. If you’re visiting far-off and rural areas, your mobile phone might not have signal. If this is the case, carry a two-way radio or satellite phone.
- Always take a decent flashlight and I recommend taking a high-end headlamp like a LED Lenser to free up your hands. LED lensers are available in South Africa at Cape Union Mart and other travel shops.
- Always take spare batteries for essential equipment like your phone, two-way radio or torch.
- Keep essential equipment like your phone and torch dry by keeping it in a waterproof zipper-bag.
- Wear proper, protective shoes.
- Dress the part. If visiting hot-as-hell areas, wear long-sleeves and loose fitting white clothes. For colder areas, the opposite!
- Hats, Sunscreen (factor 30 and above) and Sunglasses!
- Always take spare warm clothes. Even if you don’t plan to stay out late.
- Make sure you have water with you, always!
Scouting for Light and Subject
Successful landscape photography depends on light. It is vital that you are at the right place, at the right time. If not, you’re wasting your time. Professional landscape photographers prefer to photograph during the golden hours. During the day, when the light is harsh, they use their time for reconnaissance and administrative tasks. They scout for scenes they can come back to, when the sun’s at a preferred angle, and the colours are more magical. If you’re a regular Joe, you may not have the luxury to take photos for hours when you’re on holiday with family or friends. The family will certainly make you “rush” your photo-taking. Use the time you spend with them during the day, to look out for scenic locations you can come back to later. During day-time, take quick, out of hand shots with the sun at your back to avoid wasting time and offending your travel companions! Spend daytime – when the light’s harsh – with them, but keep the golden hours for yourself! Shoot sunrise before the family gets up and keep them so busy during the day, that they gladly let you go to shoot at sunset!
“Working” the Light
“Light makes photography. Embrace light. Admire it. Love it. But above all, know light. Know it for all you are worth, and you will know the key to photography.” George Eastman
Knowing how to “read” the light is the most important key to good photography, and especially true for landscape photographers. When shooting landscapes and scenes you need to find a system to “work the light” and let the light (and shadows) work for you. The key is to get out there and capture landscape scenes during the golden hours when everything bask in the warm light, and shadow casts are soft and long. Shooting in such glorious, directional light, allows you to capture mood and atmosphere. Using light AND shadow will turn your landscapes into works of art!

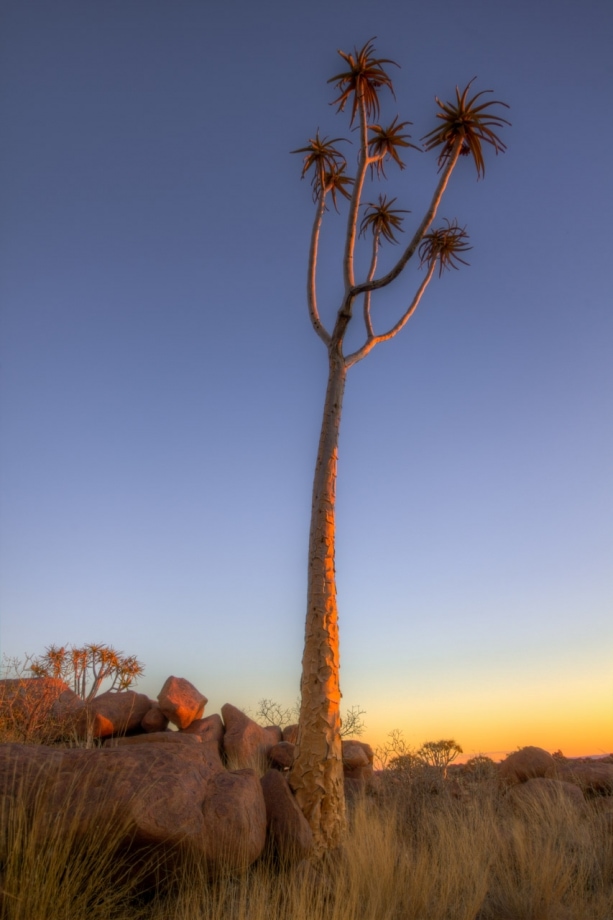
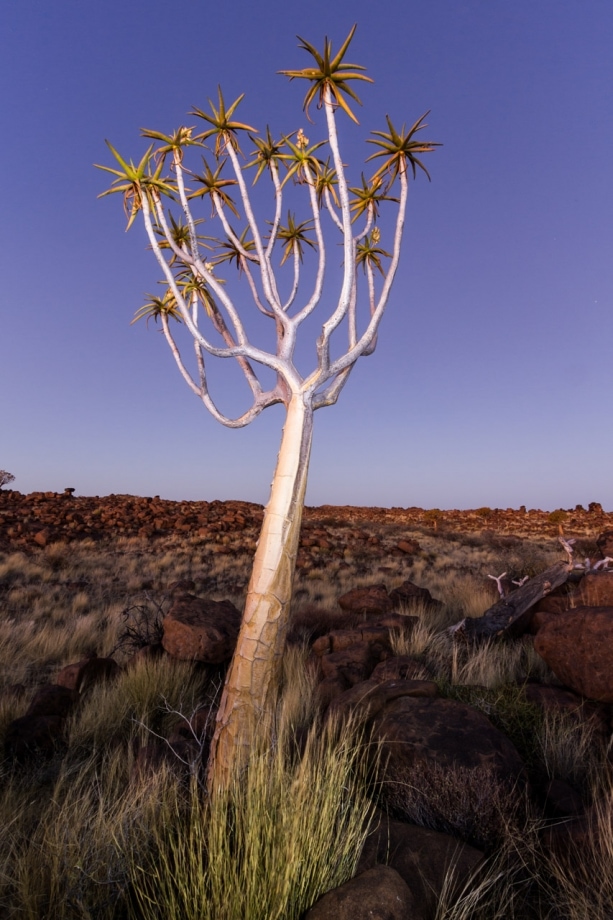
“Quiver Tree at Sunset, Giants Playground, Namibia ” The last daylight falling on the side of the quiver tree makes a simple composition almost magical. ISO-100 at f/16. Tripod used.
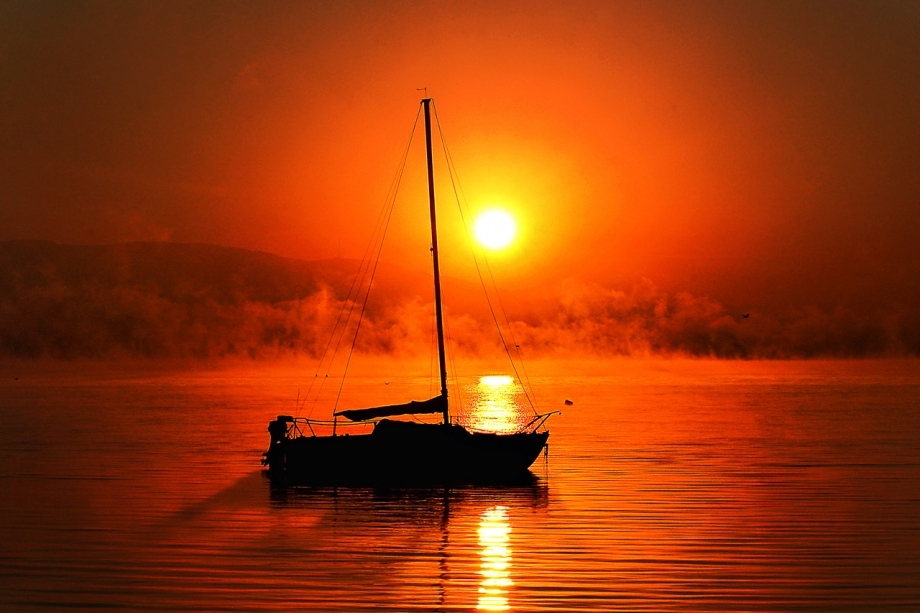
Shooting Dawn and Sunrise
The light in the morning is usually clean and the air still. You want to setup and start photographing at dawn, long before sunrise. Be sure that you’re out there, at least 1 hour to 45 minutes before sunrise and use slow shutter speeds to “drink-in” the ambient colours. The colour in the sky is usually beautiful at dawn, and is often referred to as the morning blue hour. Before you know it, the light will brighten up on the horizon; especially in the absence of clouds and fog. I suggest you use a ND-Grad filter to cover the bright sky with the dark filter-area. You can also change your shooting angle to exclude the bright areas completely. During sunrise (which normally lasts only a few minutes), you typically want to capture backlit scenes and capture the sun’s orb with foreground elements in the scene. On partly cloudy and misty days, the bright light might be subdued and allow you to take pictures for longer.
“Sunrise, Matemo Island, Mozambique”
“Fiery Lake, Hartebeespoort Dam” A sunrise image, shot with backlighting. Tip: set your camera’s white balance to Cloudy, or Shade to warm up the scene even more.
“Trees with backlighting, Middelburg, Mpumalanga” It is always a good idea to hide the rising, or setting sun behind elements like tree-lines. Tip: Chromatic Aberration often causes serious image quality issues when shooting high contrast scenes like this. If your camera has lens aberration control, make sure you enable it. If not, Lightroom and Photoshop offer lens correction tools that can deal with it.
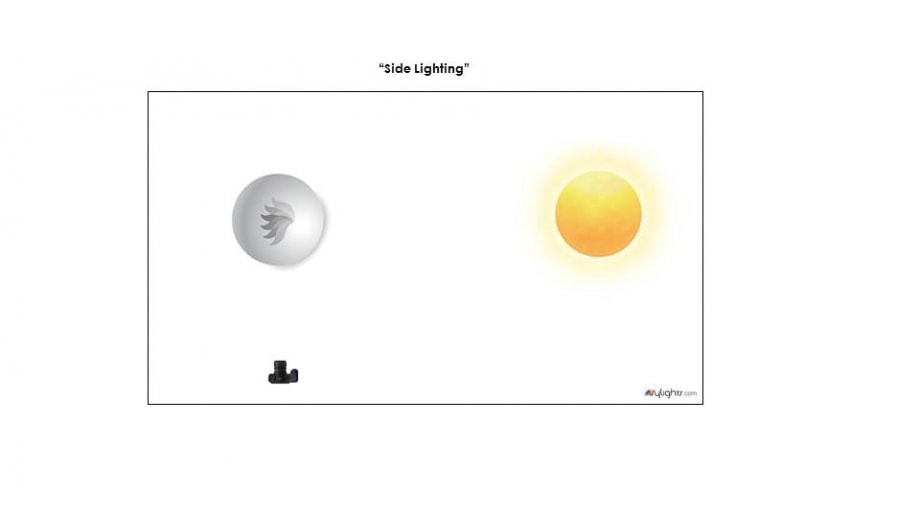
The Drama of Side-Lighting
If the sun’s completely out, but still low and directional, make use of side-lighting. Side lighting reveals wonderful depth and drama and is the preferred lighting for many professional landscape photographers.


“Baobab and low sun, Limpopo” Make use of directional and side-lighting to provide depth and drama
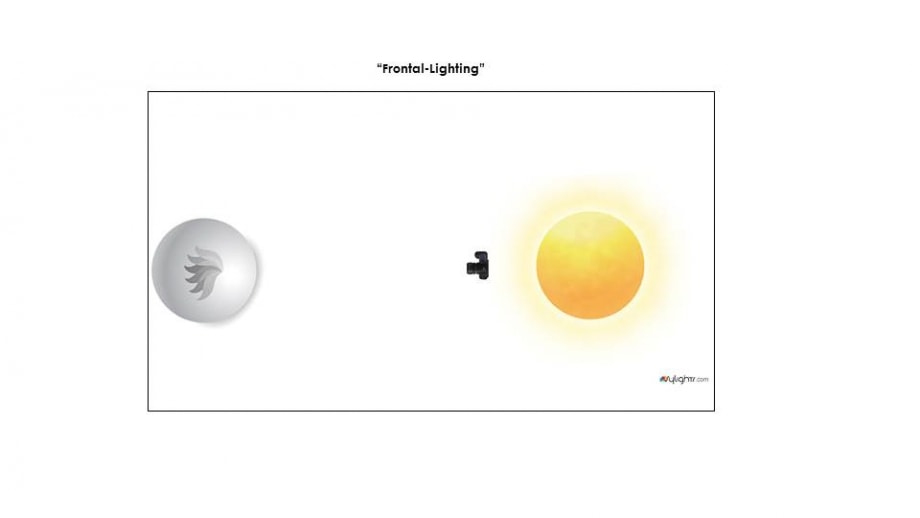
Frontal-Lighting
Avoid photographing scenes with a bright, white sky in it. When the sunlight becomes too harsh, turn your back at it. In other words, shoot away from the sun (sun-at-your -back-rule). Frontal lighting is often referred to as “flat light”, but is great for capturing details. Use a circular polarizer filter to take care of glare and reflections and retain colour in the skies.
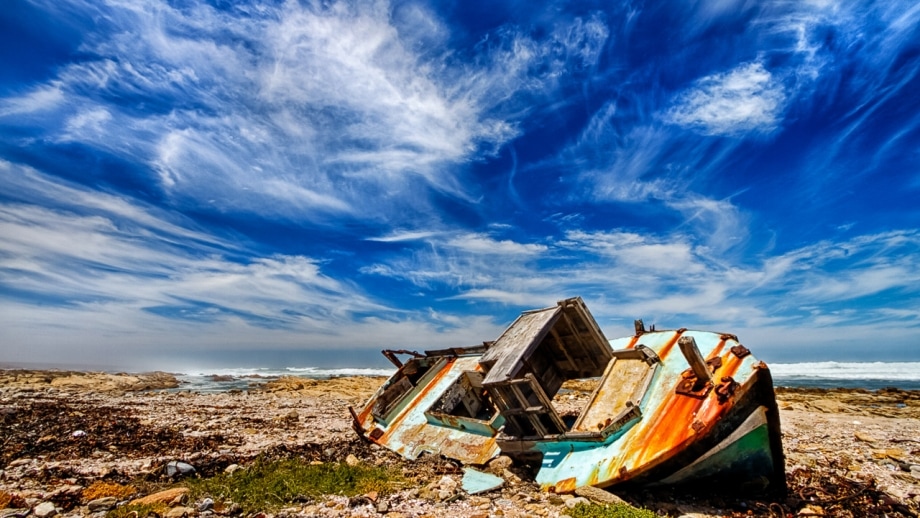
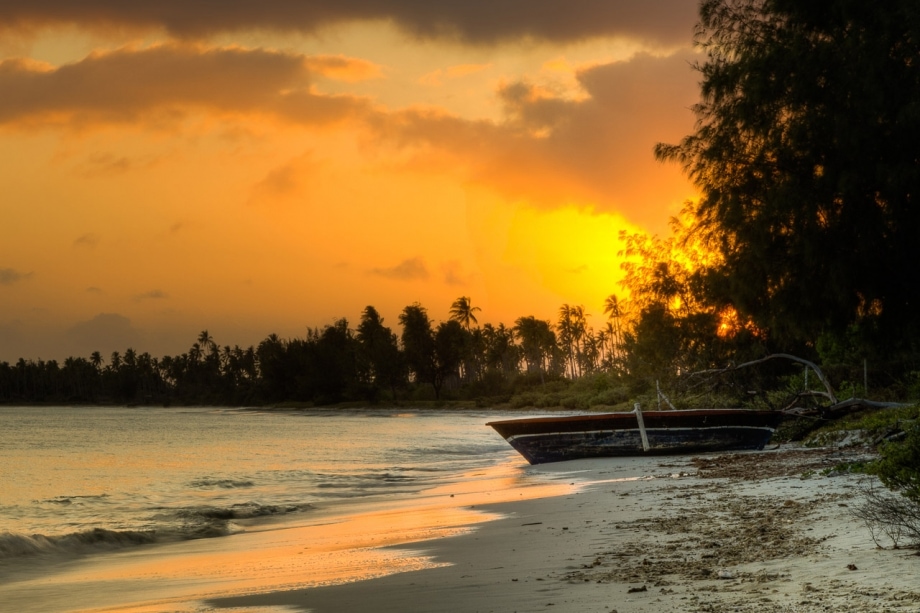
“Boat Wreck, Diamond Coast” We often refer to the sun from behind as “flat light” but shooting into high sun is rarely a good idea as the clouds are often washed out. For this shot, I used a circular polarizer to increase the colour and contrast in order to maximise the colours in the sky.
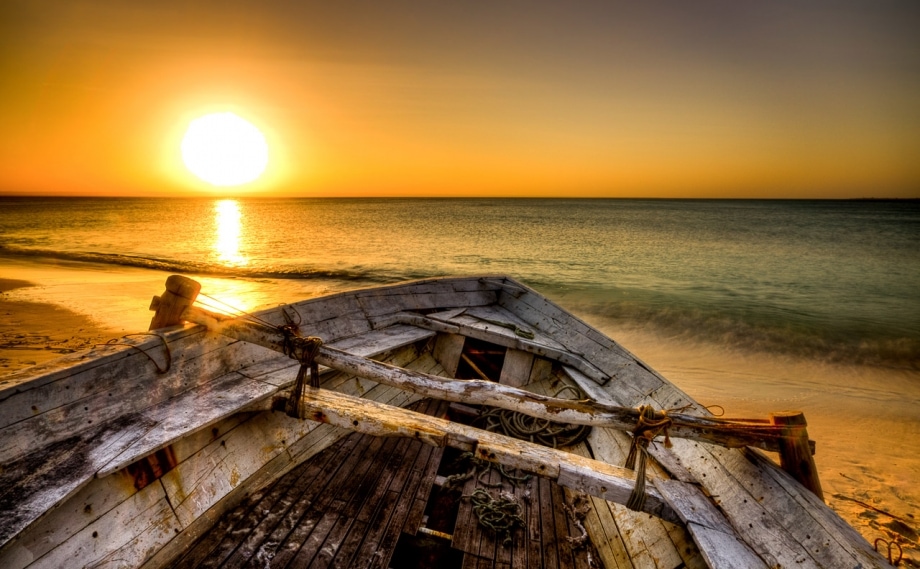
Sunset and Dusk
Be sure you are ready for the late golden hour, at least an hour before sunset. Whereas the air and sky is clean of particles in the mornings, the late afternoon hours will often carry dust particles in the atmosphere, which cause “warmer” and magical sunsets. If the sun start casting those long shadows back towards you; you’re entering photography heaven! Make use of side and backlighting during this time. When the sun dips behind the horizon, do not pack up. The fun just started! Soon, you will get the night blue hour. Now it’s time for long exposures and light trails. After dark you might increase the exposure times even more, using Bulb mode to capture star trails!
“Matemo Island, Mozambique” This sunset scene was shot at sunset. Matemo Island is located in the top parts of Mozambique and when you’re that close to the equator, the light is not as soft as lower down. On cloudless days, you typically battle with harsh light even just before the sun dips behind the horizon. Situations like this call for the use of ND Graduated filters and positioning the dark part of the filter over the bright sun.
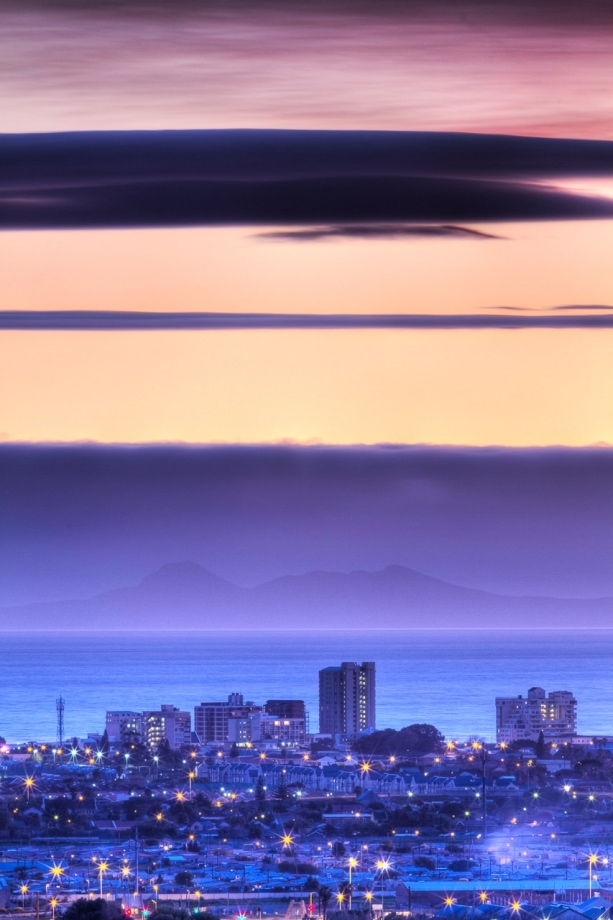
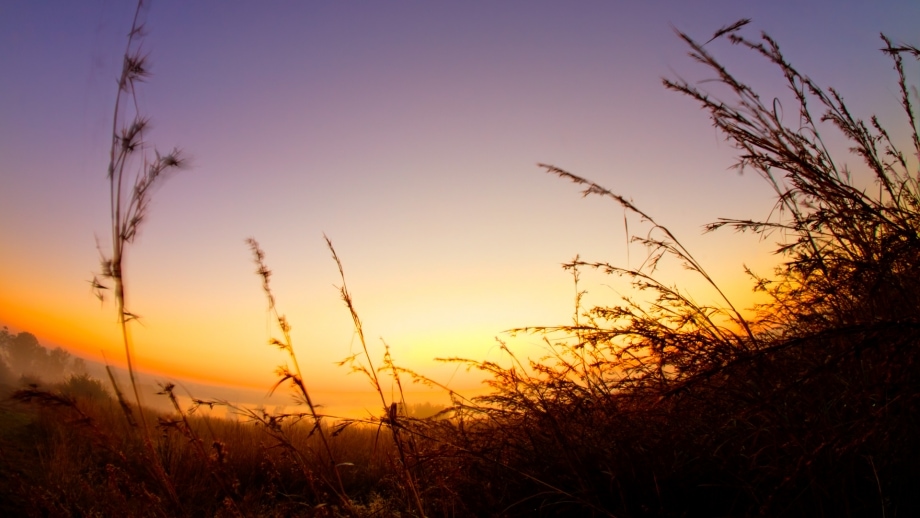
“Strand, Western Cape” This long, multiple exposure was shot during the blue hour at dusk and shows a fantastic array of colours. Purple and orange hues are typically found at dusk and dawn.
Shooting at Dawn or Dusk…
Beginner photographers are often elated when they make their first long exposures before sunrise, or after sunset. The purple, orange, pink and blue hues are amazing when shooting during these periods we refer to as Dawn or Dusk. Moreover, one can still capture colour and light, long before sunrise, or after sunset, when there is neither full daylight, nor complete darkness. We refer to it as the blue hour. Photography during the blue hour requires slow shutter speeds and any movement occurring in the clouds and the sea will be blurred in a surreal way.

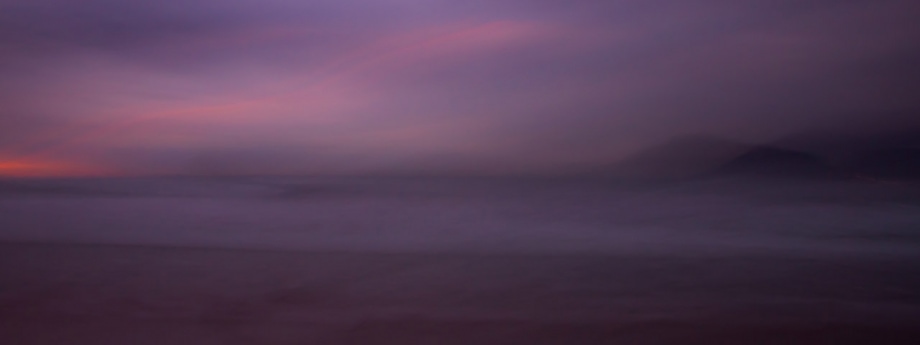
“Kommetjie Seascape, Western Cape” For this impressionist – creative blur – landscape, I moved the tripod while the camera was still exposing the scene. The image was taken after sunset and provides a wonderful display of the light and colours that are still available, even after the sun has dipped behind the horizon. ISO-100, 2 sec at f/7.1
Lighting Types Explained
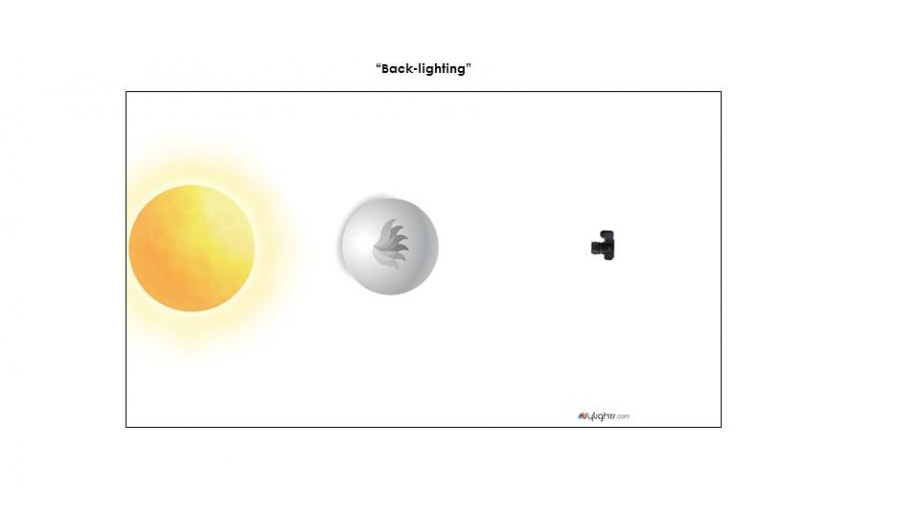
Back-lighting is very dramatic! Shooting with backlighting and underexposing the scene in front of you creates dramatic silhouettes.
As soon as the sun’s up and the skies turn white in front of you, turn around and shoot with the sun at your back. Use a circular polarizer to deepen blue skies
Shoot side-lit scenes when the sun’s low and directional for sculpting scenes with interesting light
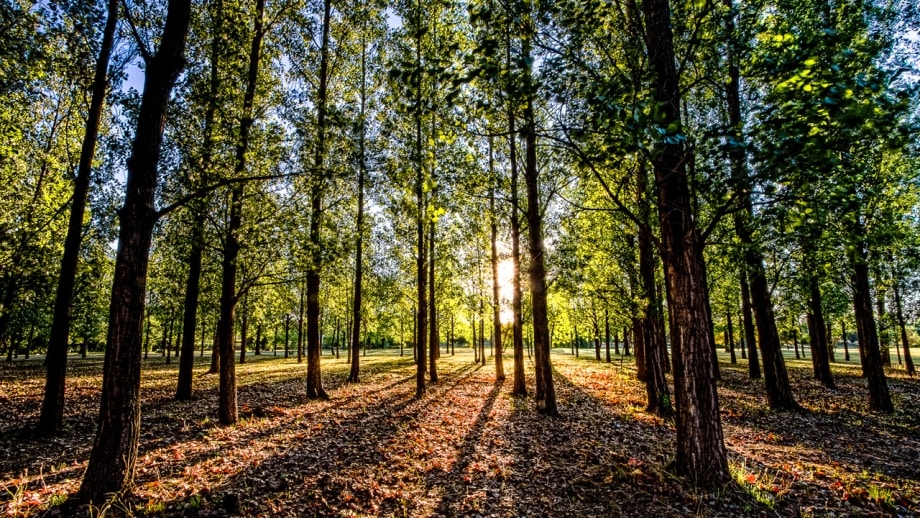
Cloudy and overcast days
We all know that overcast and cloudy days are often the best for portraits. Those grey and dreary skies rarely work for stunning landscapes. However, on overcast days, all the elements on ground level are soft and diffused, and you might as well angle the camera down, and shoot “mini-landscapes”.
Also make sure that you look for interesting light patterns when the sun breaks through cloud cover. Bright overcast days typically do not yield “photogenic” skies and you want to avoid bright skylines completely. In mist and fog, shoot soft images and silhouettes. Use a warm-up, or magenta filter to add life and colour to the scenery. If you fancy minimalism, the grey skies might work; and if you have dark, aggressive clouds why not shooting HDR’s? The point is, be creative on overcast days and you don’t want to pack your camera away.
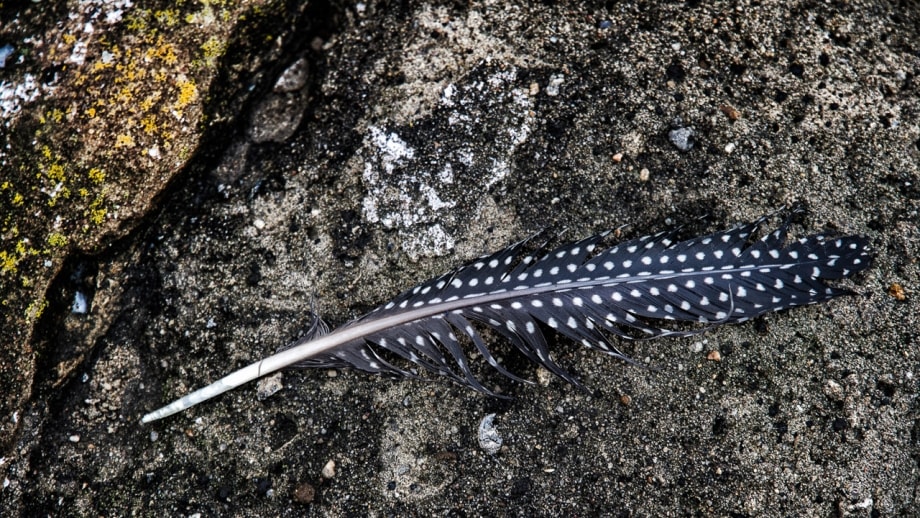
“Feather on Rock, Mpumalanga” This image was shot on a rainy, overcast day. Angle the camera down and shoot mini landscapes when the sky is overcast and dull. The colours and textures are especially awesome after the rains.

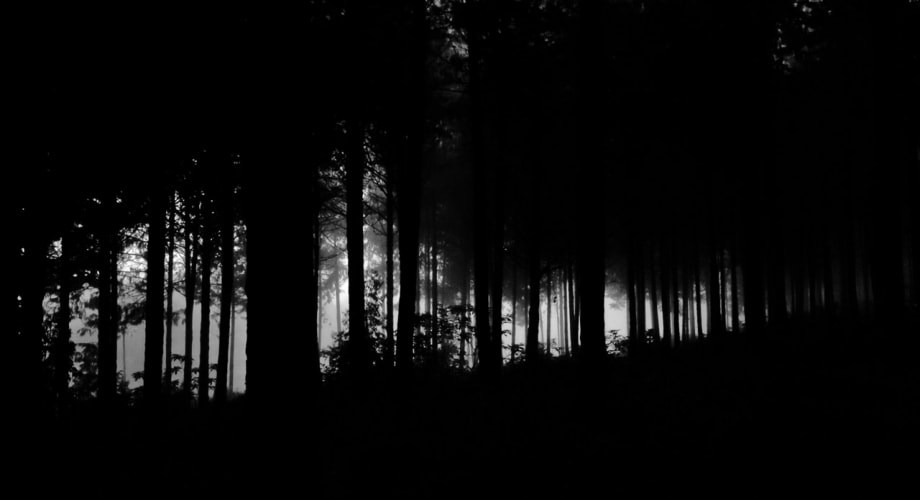
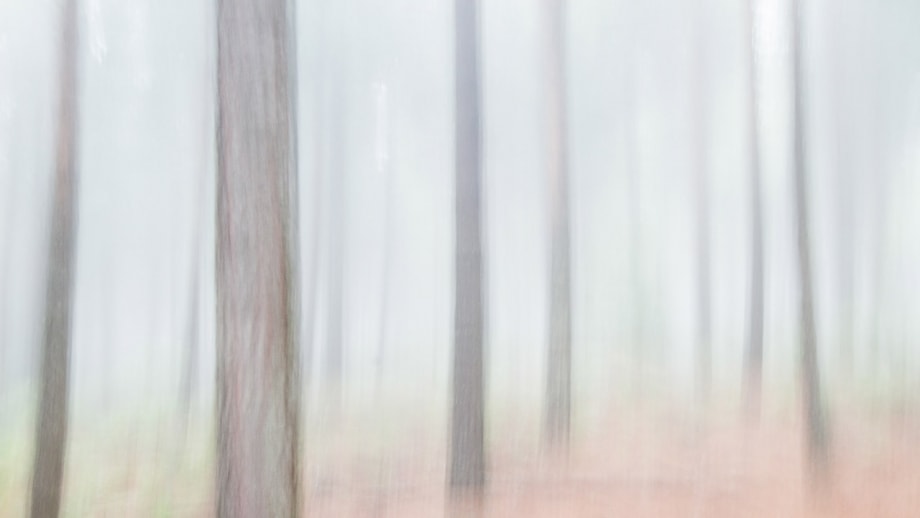
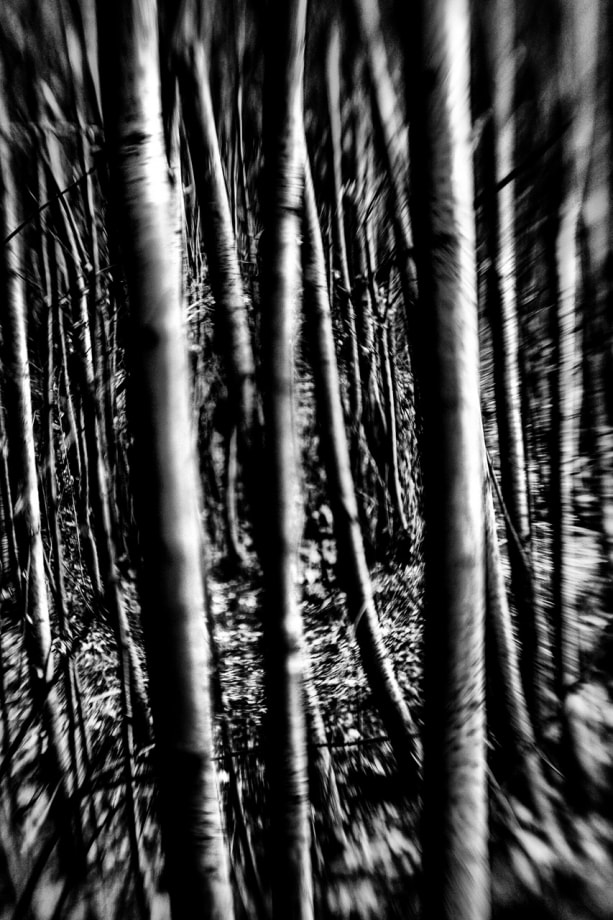
“Pine Forest near Kaapsche Hoop” I shot this low-key scene on a misty day. I underexposed the camera in order to expose for the mist and create a really dramatic, almost ghostly atmosphere. You almost expect a man with an axe to jump out from behind one of the trees!

“Matla Power Station, Mpumalanga” I really dig the sun filtering through the clouds and adding to the interesting composition, which is a juxtapose between the hay-bale and the power station in the back.
Creative Camera Settings
“Dummy” Settings
As a landscape photographer, you can get away with using a few standard settings for “most” scenes. However, if you truly want to be creative, you need a solid understanding of how all the elements of the Exposure Triangle, work together. Knowing which combinations of ISO – Shutter Speed – Aperture to use in order to control Depth-of-Field and Blur, which are two of the most important aspects of Landscape Photography, will get you ahead of the pack.

Using creative techniques like double exposures and motion-blur allows for artistic end-products. This image is a combination of different techniques i.e. Moving the camera against a vertical plane while exposing, Vertical Panning, and Multiple exposures. Having a solid understanding of how the exposure triangle work, is essential for creating artistic images.
I don’t want to spend too much time with the finer details of exposure, but understanding the difference between metering modes when shooting in the creative modes like Aperture Priority and Shutter Priority, will improve the accuracy of your exposures. For general, corner-to corner, average scenes, simply use Evaluative (Canon) Matrix (Nikon) or Multi-Segment (other) Metering. For high contrast scenes, i.e. shooting a dark subject against a bright background, or vice versa, use Spot, or Center-weighted metering.
Use Low ISO Speeds for ultimate quality
Since landscape shooters often work when the light’s soft and dim, make sure you use the lowest ISO possible in order to combat noise and will allow you to print glorious, large format prints afterwards. Never use Auto-ISO when shooting scenes. As a rule, I stick to ISO 50 – 100, but don’t mind using ISO-200 if I need a faster exposure time i.e. when shooting in strong winds.
Aperture Priority for Front to Back Sharpness
Landscape photography is not difficult when realising that you can accomplish fantastic results by shooting in aperture priority and understanding that small apertures result in wide depth of field (focus from front to back). Shooting at f/11 – f/22 with standard, and wide angle lenses will typically render sufficient focus from front to back. If you use an ultra-wide or wide angle lens, you can normally shoot landscapes at apertures ranging from F/8 to F/22. Take into account that longer lenses generally provide a shallower DOF. For example, if using a 200mm lens, you may have to use apertures, smaller than F/22. Also take into account that your DSLR’s sensor size, has a direct bearing on Depth of Field. APS-C size sensors, generally provides more depth of field than 35mm (full frame) sensors. For example, a specific scene may require you to use F/11 when shooting with an APS-C camera, whereas using a Full Frame camera, may require you to use F/16 for that same scene.
For complete accuracy, you can always use a depth of field calculator to ensure sufficient focus for any scene. Depth of Field calculator Apps are available for IOS and Android, which turns your smartphone in a pretty useful tool on location. However, if you don’t want to spend all your time calculating depth of field, you may stick to the rule of thumb that F/8- F/16 will be ample enough for most wide-angle scenes when using an APS-C camera, and F/11 – F/22 for full frame cameras.
“Mopani Veld Limpopo” Printed large, this image appears pretty sharp from front to back. I used a wide-angle lens and small aperture in order to obtain front-to-back focus and sharpness when I shot this HDR Image. ISO-100, 3 exposures with 2 stops difference at F/22. Aperture Priority. Tripod used
Dummy Settings: Shooting Landscapes in Aperture Priority for front to back sharpness
|
Tripod |
Essential |
|
Program Mode |
Aperture Priority |
|
ISO |
100 – 200 |
|
Aperture |
Select a small aperture i.e. F/11 – F/22 |
|
Drive Mode |
Remote Control / Timer Mode |
|
Focus Points |
Wide Focus Area for Sunrise scene and Single focus points for detail shots |
|
White Balance |
Set your white balance to Cloudy / Shade if you would like to warm up the colours of sunset and sunrise. If you shoot in RAW you can always change the white balance 100% accurately in post. |
|
Filters |
• UV Filter & Circular Polarizer to minimize haze and reflections • ND Grad tone the sky down |
Creative Blur and Slow Shutter Speeds
Landscape photography can be simple. During the day, when the light’s sufficient, use Aperture Priority. At dawn, or dusk switch over to Shutter Priority and shoot long exposures of up to 30 seconds. If you require even longer exposures i.e. shooting star trails then go for Bulb mode.
Using slow shutter speeds however, is not limited to low light conditions only; you can always use a Neutral Density (ND) filter to reduce light flowing into the lens in daylight. My favourite ND Filter is a screw-on type, variable ND filter. It allows me to stop down the light flowing into the lens between 2-8 stops. I can easily do a 30 second exposure in broad daylight with my Vari-Nd filter! Just make sure you buy a good quality ND-filters since many cheaper brands are known to introduce colour casts.
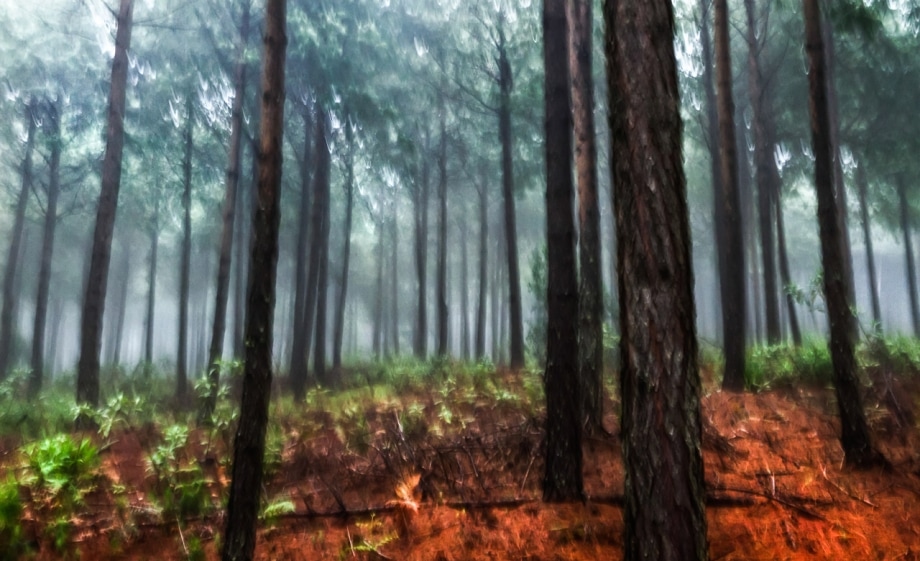
“Impressionist Pines, near Kaapsche Hoop, Mpumalanga” For this high-key, impressionist photo, I moved the camera up and down (Vertical Panning) on a foggy day while overexposing the scene with 2 stops. Apart from slightly enhancing the colour, contrast, and clarity, I have done very little in post processing and this is a great example of what can be achieved when experimenting with slow shutter speeds. ISO-100, 1.6 sec at F/16. +2 EV. Aperture Priority. Handheld
“Natural Bridge, Mpumalanga, 2006” This image was captured using an exposure of 1/6th sec, which was sufficient enough to blur the fast moving water.
Dummy Settings: Shooting in Shutter Priority in order to Blur Waterfalls, Rapids, Seascapes and Light Trails
|
Tripod |
Essential |
|
Program Mode |
Shutter Priority |
|
ISO |
100 – 200 |
|
Shutter Speed |
Long exposures of around 2 sec – 30 sec for blur (1/6th of a second minimum for fast moving water) |
|
Drive Mode |
Remote Control / Timer Mode |
|
Focus Points |
Wide Focus Area |
|
White Balance |
Set your white balance to Cloudy / Shade if you would like to warm up the colours of sunset and sunrise. If you shoot in RAW you can always change the white balance 100% accurately in post. |
|
Filters |
• Neutral Density Filter (ND Filter) to ensure long exposures • Use an ND Grad filter and place it over moving water to prevent burnt-our highlights • If you decide to keep on shooting when bright (specular) highlights appear, then you may use a circular polarizer filter to deal with the reflections. Remember, you do not want to get rid of all the reflections though. |
Best Practise
Here are a few important aspects you need to consider when shooting landscapes:
- Remember to switch “off” the Image Stabilizer when you’re shooting long exposures from a tripod, it will soften your image and is designed for handheld shooting.
- Use a remote control to prevent any camera movement while making an exposure.
- If you don’t have a remote control, use your camera’s self-timer mode.
- Set your in camera noise reduction to “on” in low light situations i.e. at dawn, dusk, or in darkness.
- Use your camera’s mirror lockup function to prevent the slightest of camera movement while making an exposure.
- Whenever possible, bracket your images using your camera’s Auto Exposure Bracketing (AEB) feature and then combine the images to create HDR images.
Black and White
“Black and white presents the viewer with a single message; it gets rid of the complexities, dynamics and differences of colour. It forces the eye to examine the composition and content; it keeps the mind free from excess data”
I prefer to shoot in colour and only convert to black in white afterwards. Modern software programs like Nik Silver Efex Pro 2 have been designed to mimic traditional black and white films and quite easy to create with fantastic black and white images. Sometimes, I might choose my camera’s black and white mode when shooting in RAW, in order to view each scene on the camera’s LCD in Black and White to get an accurate idea of the tonal range. Shooting in Black and White mode in Jpeg, will be fatal however since you will have very little control over your black and white conversions later.
“Ponta Do Ouro, Mozambique” Personally, I prefer minimalistic, black and white images. The colour image of this scene was okay, but not nearly as striking as its black and white version. HDR image, 3 bracketed images at 2 stops difference. ISO-100, F/22. Aperture Priority. Tripod used.
The Landscape Photographer’s Kit
Typically, you will find the following equipment in a landscape photographer’s kit:
Stability and Sturdy Tripods
Since you will typically use low ISO’s like ISO-100 (for best quality and low noise) with small apertures and resulting slow shutter speeds you clearly need to hold the camera very still in order to get sharp enough images. To prevent soft, blurry images, you definitely need to use a solid tripod. It won’t help you to spend a fortune on cameras and sharp lenses if you cannot keep it rock-solid steady during an exposure. Here are a few measures you should take into account in your quest to capture pin sharp landscape scenes:
- If you don’t have a tripod, use a bean bag, or place the camera on a solid surface
- Use a remote control, or your camera’s self-timer mode to trigger the shutter
- Use your camera’s mirror lock for really long exposures
- Switch the image stabilizer in your camera or lens off when the camera goes onto the tripod. When it goes back into the hand, switch on again.
Lens Choice
Knowing which lens to use for different scenes is vitally important to the success of a photographer:
Wide angle lenses
-
- Makes elements appear further apart and therefore ideal for wide scenes. An effective way to use these lenses is to angle them down and include foreground objects to make your photos more interesting.
-
Telephoto Lenses
- Landscape photography is certainly not limited to wide-angle lenses. Use a longer lens to compress elements and make them appear closer to one another for more “intimate” compositions.
-
Special Effect Lenses
- Use special effect lenses like the Lens Baby, Fish-eye lenses, Tilt-and-shift lenses for interesting effects.

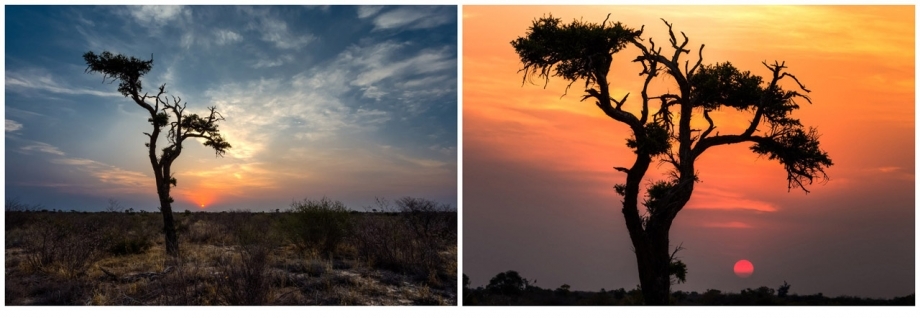
“Kalahari Sunset, Botswana, 2013” The images above were shot a few minutes apart at different focal lengths. The image on the left was photographed at 17mm, which is ultra-wide angle on a Full Frame Camera and shows the tree in context to the foreground and skies. The image on the right was photographed at 167mm (Full Frame) and brings the sun right into the scene for a more intimate composition.
“Ponta Do Ouro, Mozambique” This image was taken using an ultra wide angle lens at 11 mm (35mm equivalent = 17mm). Using wide angle lenses allows you to include interesting foreground elements and at the same time reveals large sky areas. HDR Image using 3 bracketed images at 2 stops difference. ISO-100, 3 exposures with 2 stops difference at F/22. Aperture Priority. Tripod used
“Ghost Poplars shot near Muldersdrift, Gauteng” This high contrast, side-lit scene was shot with a lensbaby 2. Lensbabies are affordable manual lenses that come in different designs to create various special effects like blurring the edges, selective focusing etc. ISO-250, 1/160th sec F/2.8. Handheld


“Industrial Landscapes” near Delmas Mpumalanga, 2013. This industrial landscape scene was shot using Canon’s 90mm f/2.8 Tilt and Shift lens. I used the tilt function of the lens to dramatically alter the focus plane for an impressionist, fine art interpretation. ISO-100 1/320th sec at f4. Tripod used.
“Colours of Dawn, Rietvlei Dam, 2011” This very simple composition was shot with a 10mm one morning at sunrise while taking out a group of photography students for a practical class. I used a Sigma 10mm f.2,8 HSM Fisheye lens and love how the distortion of the horizon makes an otherwise mediocre composition an interesting one. To create this image I shot 3 exposures at 2 stops difference (-2, 0 and +2 EV) and then used Photomatix Pro to merge them into a single exposure. ISO-100 at f/22. Tripod used.
Filters
There are hundreds and thousands of different filters available. With the advent of digital retouching, you can mimic some of the effects in post editing. However, the following filters are indispensable for Landscape Photographers. Effects by these filters cannot be accurately reproduced in digital photo editing. Here’s a summary of their functions and how to use them:
Circular Polarizers
-
- Minimizes glare and reflection and as a result, enhance colours and highlight details.
- Circular Polarizers screws onto the front of your lens and by rotating the filter’s front element you can minimize, or magnify the polarising effect.
- Use less polarization when you attempt to capture a “milky” effect on the surface while photographing slow, moving water.
- Use more polarization when you’re shooting in harsh environments and would like to deepen the skies and foreground elements.
- Wide Angle lenses do not “polarise” well and often introduce false and halo effects. When using a Circular Polarizer, keep to “normal” focal lengths.
Neutral Density Filters
-
- Stops out light and allow you to use slower shutter speeds to induce creative blurs such as when photographing seascapes and moving water.
- You get two types of ND Filters; the square types and round, screw-on types.
- The square type filters can be fitted on various lens threads by using different step-adapters
- The round screw-on filters can only be used on smaller lens threads by using step down rings.
- Variable ND filters, are screw-on filters, which allow you to increase, or decrease the light flowing into the lens by simply rotating the filter.
- The ND-graduated filter also called a Split-Grad allows you to darken the sky and keep the foreground brighter. When shooting slow moving water, you can turn it around and place the darker area over the water to prevent it from “burning out”.
Neutral Density Graduated Filters
-
- Commonly referred to as “Split Grads” or “ND grads”
- A graduated neutral density filter is a clear filter on one side with a shaded darker area on the other side.
- Allows you to darken the sky area of a scene while keeping the foreground untouched.
- Landscape photographers often position the dark area over bright water to prevent washed out highlights.
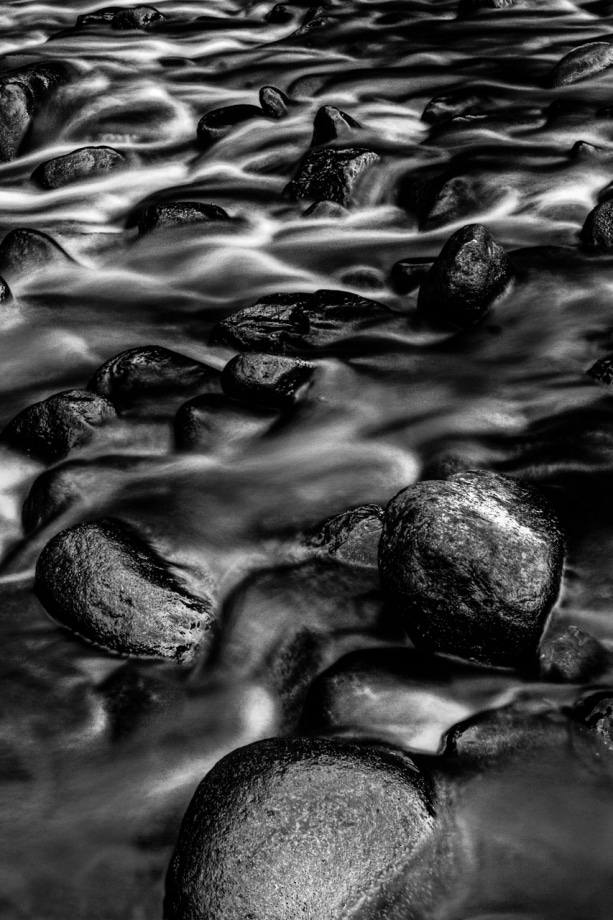
“Quicksilver” Crocodile River, Mpumalanga” Using an ND-Filter allowed me to make a 5-second exposure without overexposing the scene. ISO-100, 3 exposures at F/22. Aperture Priority. Tripod used.
Reflectors, or Fill Flash
- Reflectors and flashes are not limited to shooting portraits. When shooting in low light, use a torch, headlamp, or Speedlight to paint certain elements with light while the shutter remains open. In daylight, you can also use your reflector or flash to brighten up foreground elements. If you’re not afraid to experiment you will certainly get interesting, if not fantastic results!
“Ponta Do Ouro, Mozambique” I used an off-camera flash to light-up the rock in the foreground while making a 30-second exposure.
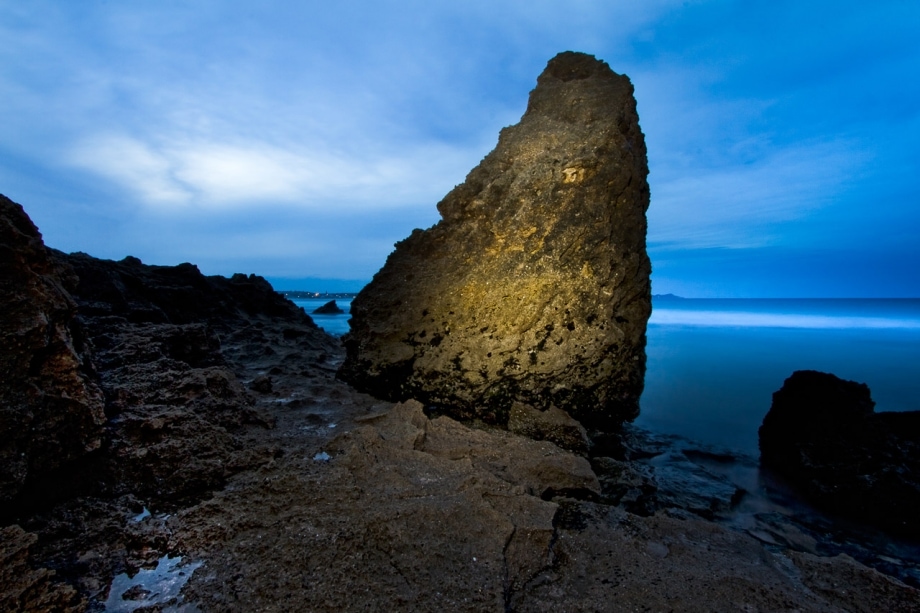
Light Painting
- Use a torch or headlamp to paint elements in low light.
“Quiver Tree, Giants PLayground, Namibia” The tree was shot at dusk, some time after sunset. I used my LED Lenser to “paint” the tree with light while doing a 25 sec exposure. ISO-100, 25 sec at f/11. Tripod
In my Bag
Below, a list of equipment I always take with me when shooting landscapes. Obviously, I don’t always carry everything on me, especially if I have to cover lots of ground. I recommend carrying a second smaller bag with you. When roaming, leave the big bag with the rest of the kit in the car’s boot, and take only the necessary items with you in the smaller travel bag.
- Canon 6D (Pros: Affordable, Image Quality, GPS, Weight. Cons: Lack of weather sealing, mediocre focus system, dynamic range)
- Vanguard Auctus Plus 323AT with BBH-300 Ball Head (Pros: Extremely solid, durable and accurate, smooth panning, Rapid Level System. Cons: Heavy)
- Vanguard Auctus Plus 323AT with Manfrotto 410 Geared Head (Geared Head is a precision tool to ensure straight lines and ideal for Architectural Photography)
- Canon 17-40 f/4L USM (Pros: Affordable sharp Wide Angle Lens, Great at f/8, Works with 77mm filters. Cons: Nothing really, maybe lacking f/2.8)
- Canon 24mm f/3.5 L II Tilt-Shift lens (Pros: Sharpest lens in my kit, Brilliant for Panoramas and Distortion free images. Cons: Expensive, Manual Focus)
- Canon 17mm f/4 L II Tilt-Shift lens (Pros: Ultra Wide, Brilliant for Panoramas and tall Buildings, Cons: Round Front Element not suitable for Filters, Expensive, Manual Focus)
- Tamron 24-70 f/2.8 VC [A007] (Pros: Affordable, Covering ultra-wide to telephoto zoom, Cons: Autofocus in low light)
- Tamron 70-200 f/2.8 VC [A009] (Pros: Affordable, Very Sharp. Cons, not quite as good at small apertures like f/32)
- Canon 90mm f/2.8 Tilt and Shift lens (Pros: Creative Focusing. Cons: Expensive, dated technology and suffering from Chromatic Aberration)
- LED Lenser H7 (Pros: Rechargeable Batteries, Powerful, Light and Durable)
- Phottix Cable Remote Shutter Release (Pros: Affordable. Cons: No LCD and electronic timer for Bulb Exposures and Time-lapse)
- Singh-Ray 77mm (Thin Mount) Vari-ND Variable Neutral Density Filter (Pros: No Colour Cast, Thin. Cons: Expensive, I need an 82mm as well)
- Formatt-Hitech Joel Tjintjelaar 100mm-system ND Filter Kit (With 82mm and 77mm rings) (Pros: 19 Stop ND System, Cons, Too Expensive, Colour Casts)
- Hoya Circular Polarizer (Pros: Eliminate Reflections and Glare. Cons: None, but I need an 82mm as well)
iPhone Apps
- Long Exposure Calculator by Junel Corales (Long Exposure Calculator and Timer to use with ND Filters)
- LightTrac (Calculates and plots the angle of the sun)
- Golden Hour (Comprehensive data on the sun, every day of the year)
My Wish List
We all have wish lists. Here are a few items I am considering buying when I’m ready to no longer hold on to my cash!
- Nikon D810 (Pros: Dynamic Range, 36 Megapixels. Cons: Will have to replace all my Canon lenses, second bodies, which will be expensive!)
- Canon 5DS (Pros: 50 Megapixels and everything else like built in timelapse, bulb timer. Cons: Dynamic Range, I’m waiting for the Canon 5D Mark IV then)
- Canon 11-24mm f/4L USM (Pros: Wider than any other non-fish-eye lens, Sharp. Cons: Expensive)
- Gigapan Epic Pro (Pros: Capture multi-gigapixel panoramas. Cons: Expensive)
Looking after your Camera Gear
Your camera and lenses are electronic devices and susceptible to the elements and as a landscape photographer you are going to face windy situations and even worse, rainstorms and sandstorms. If you’re lucky (tongue in the cheek) even a hurricane or two! When walking on slippery terrain rather put your camera back in your padded bag, for in case you slip and loose your footing. I’ve fallen pretty hard on a few occasions, but luckily my gear was put away and the padded back absorbed the impact!
Shooting in windy situations, it is inevitable that your camera’s sensor will pick up some dust specks. Shooting at small apertures for Wide Depth of Field will magnify those dust specks; especially in the sky areas. Removing the dust specks through editing will cost you a lot of unnecessary time. Here are a few tip on how to ensure a “fairly” dust free sensor and clean camera:
- Make sure you frequently have your camera serviced and sensor cleaned.
- Never change lenses, while your camera is switched On. Switch it Off first, this reduces static charge which attracts dust.
- Never change lenses while your camera is out in the open. Change your lenses in enclosed areas, or inside your camera bag.
- Cover your camera and lens with a waterproof bag when it rains, or a headband in dusty, sandy environments.
- Vacuum clean your camera bag in-between outings.
A couple of composition tips…
There is a lot written and published on composition. I can literally talk for hours about rules like Visual Weight, Golden ratio, Golden Triangle, Diagonal method, Simplification, Hierarchy, and much more… These principles are just as relevant when applied to the study of landscape photography. While it is a broad field, the points below, are the points, which I feel will be most helpful for novice landscape photographers.
Have a Clear Focal Point
“There is nothing worse than a sharp image of a fuzzy concept” Ansel Adams
Including a clear focal point is an absolutely vital element in terms of composition. In composing for landscape scenes, your first aim should be to identify a clear point of interest. Thereafter, you should carefully arrange all the surrounding elements in such a way, that it will emphasize your main subject. These “other” elements are sometimes referred to as secondary elements. If the secondary elements are visually overpowering your intended subject, you have lost that frame. Your main focal point should be distinct and provide a resting place for the eye. Therefore, always make sure that you carefully study the foreground and background before attempting the shot. Make sure you eliminate all the distracting elements, which might take away from your main subject. Include only those elements that are visually compelling, while excluding all elements that are not adding to your overall composition.
Foreground Interest
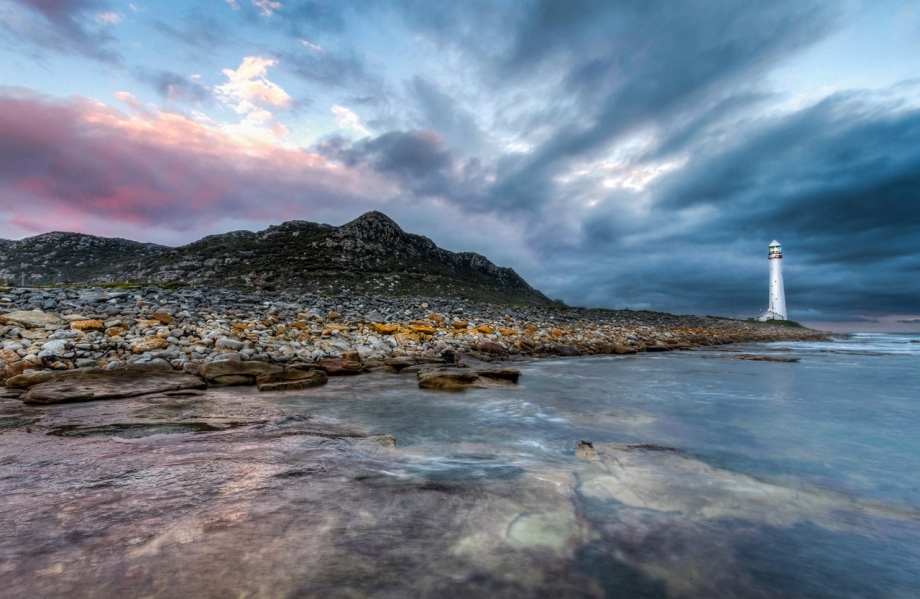
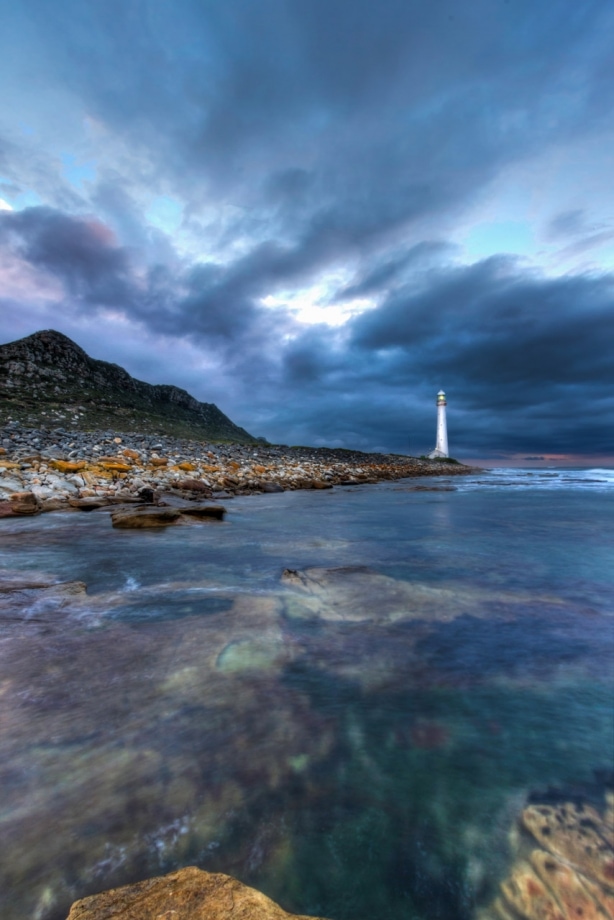
Often my photography students ask me; which piece of equipment (apart from the tripod) will make the biggest difference in their landscape photography? My answer is always; the ultra-wide angle lens. Wide angle lenses allow you to create depth by including a foreground element as well as adequate middle and background elements, for the eye to follow through. Adding elements into the foreground that contain colour, contrast, texture, suggestive lines, etc. will certainly make your photographs more interesting.
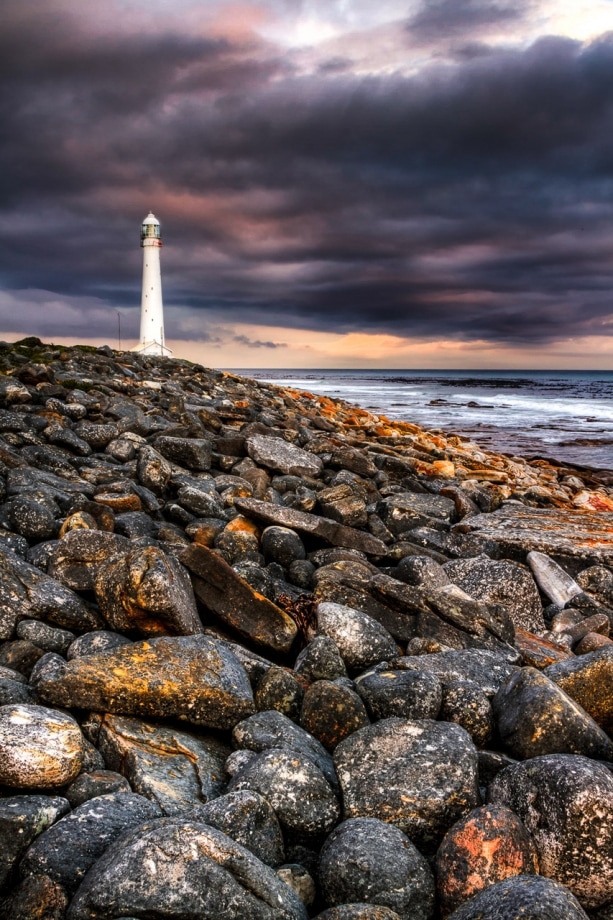
“Slangkop Lighthouse, Western Cape”. This HDR image was shot with a wide-angle lens and I purposefully angled the camera down to include the rocks with delightful textures and colours; adding life and depth to the scene. ISO-100, f/16 at 24mm. Tripod used.
Rule of Thirds
The rule of thirds, and the similar “golden ratio” are often regarded as “boring” compositional rules. However, it is likely the most effective way to accentuate a subject within the frame. It is maybe the “rule of thumb” when it comes to composition in landscape photography and you can never ignore it as a compositional tool. The rule of thirds implies that you divide the frame into three equal vertical and horizontal parts. Landscape photographers often attempt to place the horizon line or skyline on one of these lines. Taking it further; where the parts intersect (called a two-third intersection) is where you would place your main subject or focal point. The Golden Ratio, on the other hand, is very similar, but with the lines and intersections slightly more towards the center. I recommend you spend some time researching these compositional “rules” on the internet so that you know when to use it, and when it is safe to break away from it.
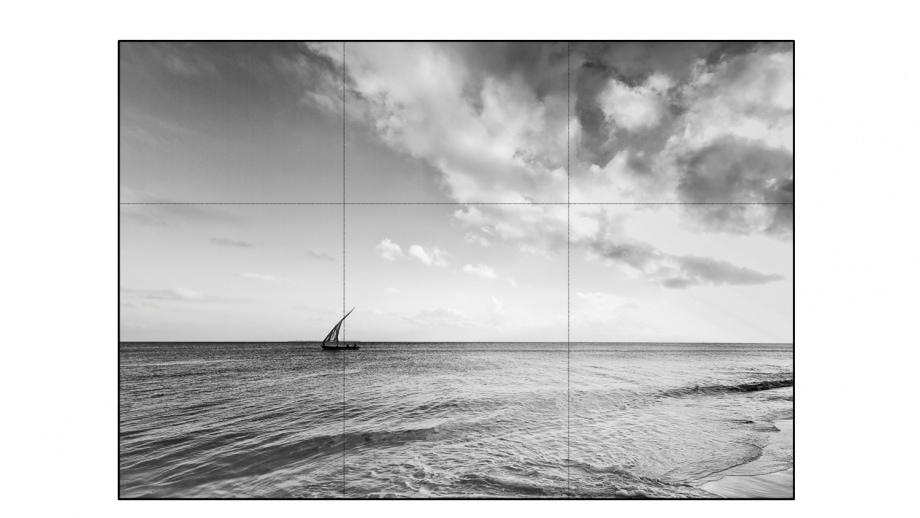
Placing your focal point, or main subject, on a two third intersection generally, places emphasis on it and is a good start to sound visual composition.
Do both formats, it gives you more options!
As a rule, photograph all scenes you shoot in both vertical and horizontal modes. If you plan to sell your images, it will allow extra options for potential buyers. At the same time, consider including negative space in some of your shots, which will allow graphic designers to add text or captions.

I typically try to shoot all landscapes in both formats. In this case, I used a Landscape or Horizontal format

I typically try to shoot all landscapes in both formats. In this case, I used a Portrait or Vertical format
Think about Lines…
Although there are literally a hundred compositional rules, which may be used by visual artists; the most prominent ones for me involve the use of lines. Composition – for me – does not start with the rule-of-thirds, golden ratio, colour, texture, or any of the other important compositional elements. Personally, I always look for lines and flow first. Lines create order in your frames. Here are a few aspects pertaining to the use of lines (and Curves) you should consider when shooting landscapes:
- Keep the horizon line straight and level (most of the time).
- Make use of leading lines to lead the eye to the main subject.
- Use horizontal lines to create peace and serenity i.e. with seascapes.
- Use vertical lines, which symbolizes power and order i.e. urban scenes.
- Diagonal lines are the most dynamic compositional line you may use and is attention-grabbing conveying a sense of energy.
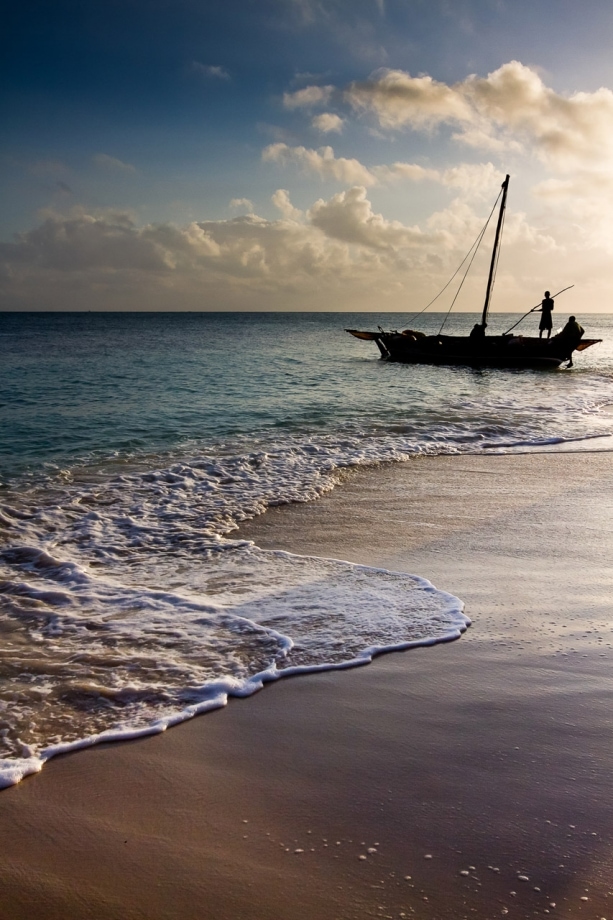
“Fisherman launching out to Sea, Matemo Island, Mozambique” This silhouette image of fishermen in Mozambique was shot one morning at sunrise. The curved water line leads the viewer eye into the frame, right towards the fishing dhow. ISO-100, 1/2500th sec at f/8. Handheld
Develop a Solid Digital Workflow!
Many “old-school” photographers get a fit when you mention “Digital Workflow”. However, workflow does not start with post-editing, but rather shooting it right. Capturing sharp images with accurate exposures is the hallmark of all good photographers; whether analogue or digital. However, no matter how sharp, or accurate your exposures, digital images are most often flat and lifeless straight out of the camera; especially if you don’t use scene modes or camera enhancements such as increasing the contrast, colour and sharpness. Letting your camera do the enhancements for you, is probably not a good thing anyway. DO NOT give up all the control to the machine, but reserve the final touches for the digital darkroom. Here are a few aspects you should consider when considering digital workflow:
- Shoot in RAW, which allows you more leeway in post editing i.e. fine-tuning your exposures, recovering highlight details, white balance, etc.
- The laws of optics let us all down and no matter how good your lens is, your images will most certainly suffer from distortion, chromatic aberration etc. Lightroom and Photoshop have built-in Lens Correction tools that will seamlessly fix these issues.
- Dodging and Burning do not belong in the past. Dodging Highlights and Burning in the Shadows for ultimate contrast is a simple process and often required to create sufficient contrast in a scene; especially for Black and White work.
- Maintain consistency in shooting and editing your photographs, which will obviously add credibility to you as a photographer and your portfolio.
- Cropping an image gives you a second chance at achieving a composition with maximum impact.
- Develop an efficient workflow by using Photo Management Software such as Lightroom, to select, sort, tag, rate, and edit your images. This should save you an incredible amount of time behind the computer, and allow you more time behind the lens!
- Use Batch Processing for repetitive tasks, such as creating HDR images, adding borders, etc.
More for later…
I hope you enjoyed this article! If you’re new to photography and would like to learn more, then check out our Basic – Intermediate Photography Courses which will demystify all the terminologies discussed here. If you’re an experienced photographer and would like to learn more about travel and landscape photography, stay tuned!
Finally, we always appreciate your feedback. Please leave us your comments or questions below, in the comments section. If any of your friends are interested in landscape photography please share this article with them!