
~ Article by Bruna Mentrup Nortje | Thru My African Lens Nature Photography
You, Me and Wildlife Photography

With the hope of inspiring and assisting more photographers to pursue their passion as Wildlife and Nature photographers, I would like to share some tips and ideas as well as expensive lessons learnt during my journey as a Wildlife Photographer in this blog. I am no professional writer or equipment reviewer; however, the desire to share stories and sharing ideas is always what drives me to seek such adventures, transforming me in profound ways, far beyond the images that inspire me on a daily basis. I will concentrate more on cameras, lenses and ways to make life easier for you when visiting game parks with the hope of following-up with useful tips regarding camera settings as well as animal behaviour in my next blog. Should Wildlife Photography interest you in any way, I trust this blog will be beneficial, interesting as well as inspiring. Please feel free share your own ideas and experiences with us by leaving a comment.
HOW TO PURSUE YOUR PASSION:
At some point, you will have to answer a critical question, “Do I want to make a career out of Wildlife Photography, or, merely capture Wildlife and Nature for the personal pleasure and rewards it has to offer. My answer to this question was the latter. I would, however, urge you to peruse with caution in choosing to make wildlife photography a career as there are many aspects to consider, which will not be discussed in this blog as it will only be based on wildlife/nature photography as a hobby.
EXPENSIVE PHOTOGRAPHIC EQUIPMENT:
Your equipment will largely depend on what your answer to the above question is. It is true that the quality of your images will most likely depend on your choice of equipment when it is your profession, but if it is only your hobby there is really no reason why you should not be able to capture beautiful images with the equipment you already have. I believe that the unfortunate truth is that for beginners, the more limited your choice of equipment is, the more it will boost your creative side and force you to gather knowledge of your equipment. Use what you’ve got in the beginning. Try your best to capture that ultimate photograph with your small frame camera with the best possible lens you can afford.
If you have a discussion with professional photographers and ask them about their equipment of choice, they will almost always give you the same answers. “For me, this is certainly not an issue with regards to producing good photographs, as my camera is only a tool! Yes, some cameras make the job easier, but a good photograph does not have to be taken with state of the art equipment”
To capture animals and birds you will need a camera and lenses which are relatively fast and perform well in low light, which means that your ISO sensitivity becomes crucial. It also makes life easier to choose a camera with sufficient continuous auto-focus points and does not weigh a tonne! The reason for this, wildlife is most active during early morning or late evenings and you will most likely have to make use of a telephoto lens which also weighs a lot.
SHOULD IT BE A FULL FRAME CAMERA, OR WILL A CAMERA WITH A CROPPED SENSOR BE ACCEPTABLE:
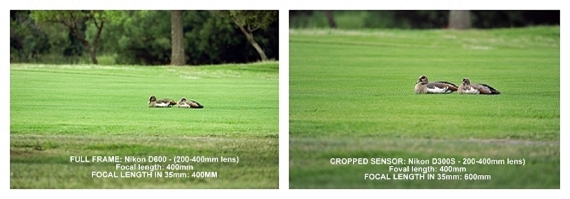
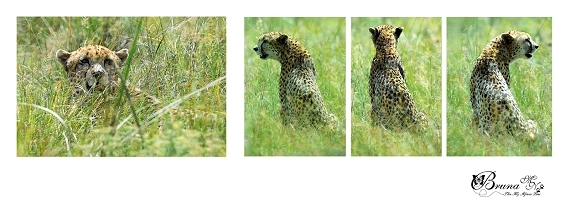
Here is an example of the same image taken from the same angle, the same distance and with the same lens, however with different cameras. The Image on the left was taken with a full frame camera and the image on the right with a cropped sensor camera.
-
Wildlife Photography by Bruna Mentrup Nortje

-
First Image on the left: Taken with a Nikon D600, which is a full frame 24.3mp DX format Camera – can handle 5.5fps – with ISO’s from 100-6400 (Still testing this camera, but I have managed to push ISO’S beyond 2000 with good results) – offers 39 autofocus points and weighs about 760g
-
Second Image on the right: Taken with a Nikon D300S which is a 13.1mp cropped sensor DX format Camera – can handle 7fps – with ISO’s from 200-3200 (losing image quality after ISO 800) – offers a remarkable 51 autofocus points. It weighs about 825g
So which camera will you take along with you when going on “safari”? Generally, full frame sensors have better image quality and reign superior when it comes to high ISO performance, but in reality for wildlife photography, a cropped sensor will actually make more sense. You can take advantage of the increased focal length offered by various magnifications and these little beauties generally have a fast continuous speed top it all off, a heck of a lot more autofocus points which are critical when photographing birds in flight or an animal kill. Both formats have their pros, as well as cons. Full frame cameras are usually larger, heavier and far more expensive. They have a multitude of benefits for professionals, but most people won’t really need these features.
The secret actually lies in what we refer to as ‘YOUR GLASS’, which would mean, your lenses – never skimp on your lenses, always try and save your money until you can afford the fastest lens wish means it should have a wide aperture such as a f/2.8. (smallest number) for example. This means that the lens can handle low light and is very fast – which is what you will need most of the time.
Be very patient and rather collect the best possible equipment over a period of time. I made a point of adding at least one item once a year. Prioritize and plan what you should add next instead of jumping at every special deal that comes along. Always ask yourself, which item will be more beneficial to me, and what will your budget allow for at that stage of your decision-making.
My first semi-professional camera, a Nikon D80 was my learning tool and to be honest, I still favour some of the images taken with that little capable camera, fitted with my first Super Telephoto Sigma 120-400 f/4.5 lens. I am by no means knocking my D80 or Sigma lens; in fact, the Sigma 120-400 f4.5 was relatively sharp, extremely light and not bad at all in low light. It was a little slow in the focusing department and a little noisy. But then, I looked after it very well and got a buyer for it so left a gap for the opportunity to replace it with a Nikkor lens instead. So, I don’t necessarily believe that bigger is better, but rather, that it will allow for more opportunities, to create with light.
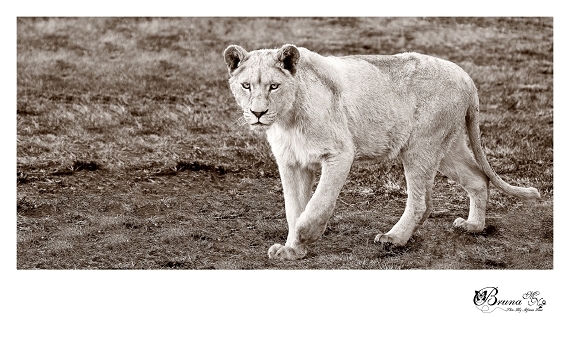
IMAGE TAKEN WITH MY NIKON D80 AND SIGMA 120-400 MM LENS
-
Wildlife Photography by Bruna Mentrup Nortje

A bit of technical Information:
120-400mm f/4.5 DG OS HSM LENS
There are basically two different sizes of sensors that come on the current digital cameras: the APS (Advance Photo System type-C) and the 35mm full frame sensor. The APS size is the smaller of the two and unfortunately, comes in a variety of sizes depending on the camera and manufacture.
The size of the Nikon DX sensor is 23.7 x 15.7mm. Each manufacturer makes a variant, which is close to this size. The full size 35 mm sensors duplicate the size of 35mm film and are 24 x 36mm in size.
A normal lens is, therefore, a lens where objects appear at a normal distance away from the camera as the eye sees it. To find the normal lens for your APS camera, you must use a factor that is supplied by the camera manufacturer to converts the APS size to the 35mm size. This factor is around 1.6 and therefore, to find the equivalent of a 50mm lens for the 35mm format to an APS equivalent, you need to divide 50 by 1.6 to get 32mm. The 32mmlens is the normal lens for the APS-C sensor format, seen on most amateur cameras. Hope this information helps a little.
Here is a list of my favourite lenses for wildlife and nature photography which was accumulated over a period of time:
Travel Lens – This should be a lens of your choice which stays on your camera most of the time – call it your workhorse like I do. The most suitable and lightest all rounder lens for your style of photography. I found this lens to be the most difficult lens to decide on. My first choice was the Sigma 18-280 f3.5 EXDC HSM lens which was affordable and I really enjoyed it very much but unfortunately, often gave me trouble. I then added a Nikkor 18-200mm f3.5 ED VR 11 lens which turned out to be a big disappointment to me personally! – it was soon traded in for the new Nikkor 28-300mm f3.5G ED VR11, released sometime last year. I can finally say that I am extremely happy with my choice. This lens is sharp, very light and handles low light very well.
Wide Angle Lens – for your landscapes – This could be any lens of your choice with a focal length shorter than 50mm. I settled for the Nikkor 14-24mm f2.8 ED. I am extremely happy with this unbeatable lens and go nowhere without it. Due to its hefty price tag, I started off with a Sigma 10-20mm f3.5 EXDC HSM, which is still a favourite, however, with the newer model camera’s such as the Nikon D600, the lens is not really compatible anymore as it is not an FX lens. (could discuss this in more detail in another blog)
Telephoto Lens – Standard telephoto lenses range from 80 – 300mm. I have invested in a Nikkor 70-200 f2.8 G ED VR11 – One of the lenses I had to wait a while for due to the price tag, however, is a must in your camera bag as most of the animals in our parks are used to cars and therefore have no problem grazing closer to the roads which allow for you to take the shot from a closer distance. The reason why I am not using my Travel lens for this, the 70-200 has an aperture of F2.8 which means it is brilliant in low light and it also produces incredibly sharp results.
Super-Telephoto Lens – Very important for bird photography – Super Telephoto lenses are generally classed as lenses above 300mm in focal length. I use a Nikkor 200-400mm f4 ED VR11 with various Teleconverters. This is also an expensive lens but unfortunately very necessary in your camera bag once your budget allows for it, should you enjoy bird photography in particular. I would have preferred to have at least a 600mm lens but I am a woman of small stature and cannot pick them up. I, therefore, use converters which rob you from a few f/stops, but fortunately the newer model cameras such as the D600 allow you to abuse the ISO slightly more. If the light conditions are in my favour, the cropped sensor normally gets me close enough to my subject matter.
If you have some money left to spare, a 300mm prime lens, which means the lens has a fixed focal length, will be an extra bonus to have, as it is a known fact that prime lenses produce best image quality by far. Next on my shopping list for sure!
WHAT MOST OF US STRUGGLE WITH:
-
Heavy Equipment: If you cannot pick it up, don’t buy it! What is the use of buying a 600mm (or more) lens, if you cannot retrieve your camera fitted with this very expensive lens from the back seat of your vehicle – rather get a lens you can manage and use a converter instead. Make sure your camera body itself is also not too heavy, which will also help a little. This is also one of the reasons why the D600 is so attractive to most wildlife photographers; it is light and really an uncomplicated piece of magic.
-
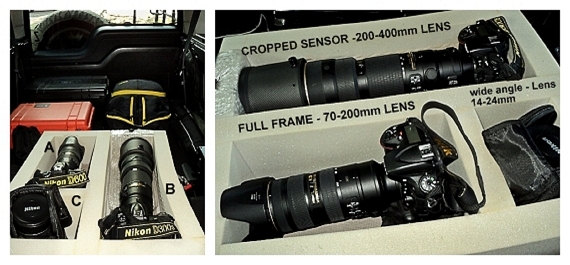
How to organize your equipment in your vehicle in enabling you to get to it fast, effortlessly, in confined spaces and ideas on how to travel without damaging or getting dust on the sensor: Invest in proper camera cases which are generally dust, water and shockproof, such as the ones in my photo. I use a B&W International outdoor type 66 Case (large black one) and a Pelican outdoor type 1500 case (the orange one) which are normally very expensive and does exactly the same thing as the B&W cases. The smaller ones in my photo below can be purchased at Outdoor Warehouse and they are not really that expensive. Some of my friends bought plastic ammo boxes from Outdoor Warehouse, lined them with a sponge and apparently does the job pretty well! They cost in the region of about R185-00 each and is also a much cheaper option.
CONSIDER THE FOLLOWING STORAGE CASES:
-
A large case for all your camera equipment
-
A medium case for your chargers, remotes, triggers, extension cords, external hard drive and a laptop.
-
Small one for spare batteries
-
Very small one for your memory cards is always a good idea.
-
Don’t forget to take your everyday camera bag with you, just in case you decide to do a hiking excursion or go on a game drive, obviously, the cases will not be suitable for that.
You will be surprised to know what corrugated dirt roads can do to your expensive equipment. Once you get into the park and pay your way, organize your equipment in the back of your vehicle as best as possible before entering the park. To make my life easier whilst on shoots, my husband made me something suitable with foam rubber, each with their own compartments allowing for my equipment to fit in snug, with lenses still attached. This is light and works just perfectly for me as I can place it behind my seat and retrieve any piece of equipment in a moment’s notice.
-
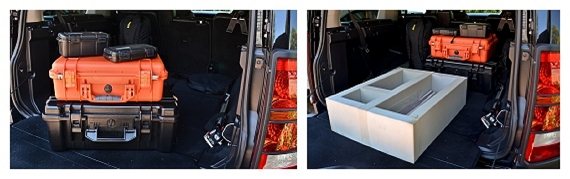
Pelican and ammo cases for equipment storage…

What Camera Equipment to take with you:
Take only what you need and be very organized. Due to the fact that we cannot get out of our vehicles to fetch equipment from the boot of your car, find a way of organising everything on the back seat of your car or put all your seats down should you have a 4×4.
WHAT I NORMALLY HAVE IN THE BACK OF MY LANDY:
-
Nikon D600 Camera with a Nikkor 70-200 f2.8 Telephoto lens.
-
Nikon D300S with a 200-400mm F4 Super Telephoto lens and a 1.7 Teleconverter on standby.
-
Nikon 14-24mm f2.8 Wide-angle lens ready for just in case.
-
Inside the Orange Pelican case in the back, I have extra memory cards and extra fully charged batteries for just in case. I have no problem climbing over to the back of my Landy should I need something urgently.

How to support our camera as best as possible to prevent camera-shake:
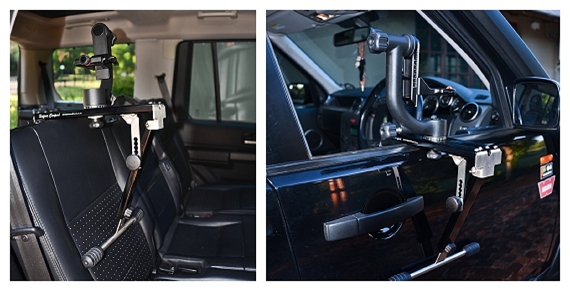
The best piece of equipment I have ever invested in was my car bracket!
-

A picture of my Car Bracket from the inside of my Landy…

-
Car brackets make life so much easier for you, and there are so many types on the market these days. Do yourself a favour and go look for one. They are easy to manoeuvre from the back of your vehicle and hook over the side of your vehicle door. You can manoeuvre them in all directions and pan with them as well.
-
I normally leave mine inside the car, hooked over the backseat when I get back home.

-
Car Brackets can make life much easier…

Easy and inexpensive way to camouflage your setup:
-
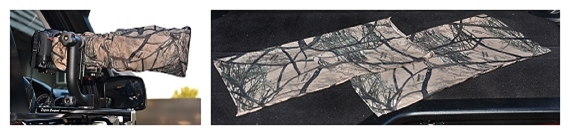
Wildlife Photography by Bruna Mentrup Nortje

-
A simple buff which can be obtained from any Outdoor Outlet does the job just as well.
PRACTICE MAKES PERFECT:
Visit places like your local Zoo or Nature Reserves where animals are used to people and cars and spend as much time getting to know your camera equipment first. By doing this you will not only get to know how your equipment operates, but also learn more about some of the more technical issues regarding photography, putting you in a better position to select the equipment needed and suitable to your style of photography. Believe me, it will save you a lot of unnecessary money spent.
ATTEND PHOTOGRAPHY COURSES AND WORKSHOPS:
If you have not already done so, attend a Basic Photography Course offered by Danie Bester and his Team at DPC. Get to know the basics and your camera, how it works, what it has to offer, what all the settings mean, where to find them and how to set them up.
What most people don’t realize when shooting wildlife, you have to change all your settings through the viewfinder of your camera without taking your eye off your subject. This means you have to find the buttons (settings) without taking your eye off your subject. Tricky, but it works like magic!
WILDLIFE PHOTOGRAPHY CHANGES YOUR PRIORITIES AND PERCEPTIONS OF LIFE:
Photography has the most beautiful way of somehow changing the way one looks at the entire scenario. Staying at hotels often robs you of the opportunity of getting closer to the very animals and the natural surroundings that you have come to capture. Knowing more about the animals and their behaviour is crucial in getting closer to them, therefore, one needs to be in their environment and not in Hotels and Lodges. Unnecessary equipment can quite easily become impractical and the very things that you would have taken for granted, suddenly become more important and meaningful. It’s the little things in life that become priceless.
-
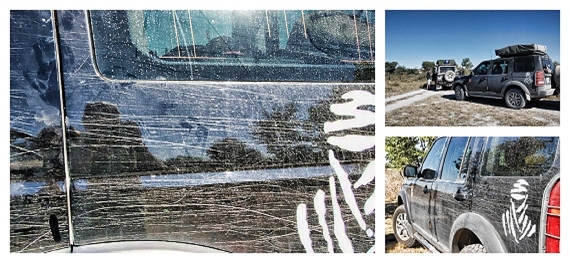
Ouch! Scratches are often a proof that you’ve been there…

Are we normal? Hours spent travelling in the salt pans, surrounded by pure ‘nothingness’ only to capture those perfect shots of ‘vast amounts of nothing’. At least my Landy has the scratches to prove we were there. The sounds of the bush and its inhabitants replace the sweetest music ever. One very seldom feels lonely in the bush alongside your passion with time almost instantaneously standing still. Hours feel like minutes, days… like hours.

Please note that all above images were used on a completely functional basis in illustrating both equipment and how they could be used. For viewing on any of my Wildlife and Nature Photography, feel free to visit my page www.thrumyafricanlens.co.za
-
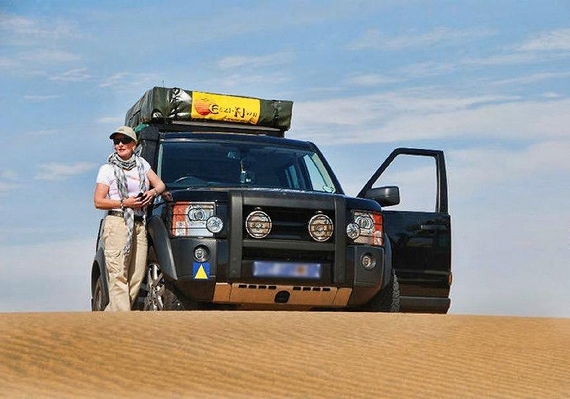
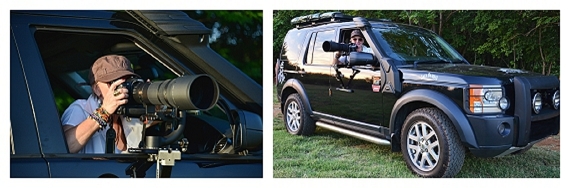
Bruna striking a pose with her “Black Rhino”

I hope that you enjoyed this blog post as much as I have, putting it all together for you.
Did you enjoy this post? You’re welcome to leave a comment. Subscribe to DPC’s newsletter and articles by clicking HERE.